 7:03:00 PM


If you recently picked up a new Mac, iPhone, iPod, or iPad, you may have seen mention of something called iCloud when setting up your device. If you don't already know, iCloud is a free syncing and backup service from Apple that aims to keep all of your devices—mobile devices running iOS 5 or later and desktop computers running OS X Lion or later, or Windows Vista or later—on the same page, with the same data, no matter which one you’re using at any given moment.
We’ve written before about what you get with your iCloud account. But what if you’re unsure about how to set up iCloud in the first place and how to get it to work on your Mac, PC, iOS device, and Apple TV? We'll show you.
Sign up for an iCloud account
A few notes before we begin: Although signing up for iCloud is free, you can’t do so just anywhere. You must create an account on either a mobile device running iOS 5 or later or a Mac running OS X 10.7.5 or later. Unfortunately, Windows users have to create an account on one of these platforms before they can log in from a PC.
Apple also limits you to creating ten iCloud accounts per device. You should ever need only one or two, so you’ll probably never run up against the limit; because the limit persists after full device wipes, however, you may see a warning about it if you’ve received an older iOS device or Mac. If you do get an alert preventing you from making a new iCloud account, I suggest going to your nearest Apple Store, where they should be able to help you sort it out.
Do you have an Apple ID?
If you’ve ever purchased anything from the iTunes Store, App Store, or iBookstore, you have an Apple ID. (It's probably the email address you used to sign up for iTunes.) If you’ve logged in to the iTunes or App Store apps with this Apple ID, you should see the email address already filled out in the Apple ID section of the iCloud screen.
All iCloud accounts stem from Apple IDs, so it’s easy to convert your current Apple ID into an iCloud account. You’ll still be able to use your Apple ID for everything you currently use it for, but you’ll also get all of iCloud’s features. And if you have family members who use this Apple ID, they’ll still be able to use it for purchases without getting all of your iCloud information. (For more on managing multiple Apple IDs and iCloud, see our explanation about common signup scenarios.)
To convert your Apple ID into an iCloud account, open the iCloud preference screen on your iOS device or Mac, and then sign in to iCloud with your current Apple ID and password. The screen will prompt you to agree to the iCloud terms and conditions; once you do, you’re ready to begin using the service.
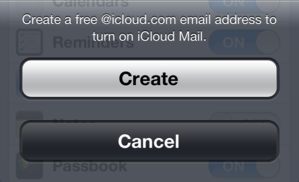
Note: If you do convert an Apple ID into an iCloud account, you won’t get an iCloud email address (@icloud.com) by default. If you want one, simply go to Settings > iCloud on an iOS device and toggle the Mail switch on (or, on a Mac, click the checkbox). You’ll then see a prompt to create an iCloud email address to go along with your account.
Starting from scratch
Never used iTunes before? On an iOS device, go ahead and tap the Get a Free Apple ID button at the bottom of the iCloud settings screen. (On a Mac, click Create an Apple ID.) The screens will request your birthdate and name, and ask whether you’d like to use a current email address or create an iCloud.com email address for your Apple ID. Even if you elect to use your old email address, you can create a new iCloud.com address after making your account by going to Settings > iCloud and turning on the Mail switch.
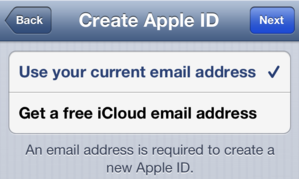
From there, you’ll either have to enter your current email address or type what you want your new iCloud email address to be. The service also prompts you for a password for your account and a security question.
After that, to finish up, simply indicate whether you want to get email updates from Apple, and then agree to the terms and conditions. You’re ready to start using iCloud.
Set up an iOS device
Originally iCloud was introduced as a sync mechanism for iOS devices, and consequently the iCloud signup process is most straightforward on your iPhone, iPad, or iPod. You need a device running iOS 5 or later; if your iPhone or iPod is still running iOS 4, you can't get in on the iCloud action until you upgrade.
When you first set up your device, you should have seen a screen asking you to sign in or sign up for an Apple ID and iCloud; even if you chose not to set that up when you first unboxed the gadget, getting an account is simple.
On your device, open the Settings app and tap the iCloud entry. You’ll see a space for logging in with an Apple ID and password, and a Get a Free Apple ID button at the bottom.
Once you’ve set up iCloud on your iOS device, most of it starts working automatically: It syncs your email (if you've set that up), along with any previously created contacts, calendars, reminders, notes, Passbook passes (iPhone-only), and Safari bookmarks, to its central online server. Photo Stream, too, starts automatically uploading the last 1000 photos you’ve taken. All iCloud options are on by default; if you want iCloud not to sync a specific item type, just tap the appropriate toggle to turn it off.

You can also start creating backups of your iOS devices by going to Settings > iCloud > Storage and Backup > Back Up Now.
Set up a Mac
The Mac setup process is very similar to that of an iPad, iPhone, or iPod: You use the iCloud settings pane in System Preferences. To add or create an iCloud account, your computer needs to be running OS X 10.7.5; any earlier, and you won’t have that pane. (Thomas Brand’s Egg Freckles blog has a few suggestions for using parts of iCloud on older systems.)

As on an iOS device, once you’ve set up iCloud on your Mac, it syncs your email (if you have set that up), contacts, calendars, and so on. All options are on by default except for 'Back to My Mac', which you must turn on manually; again, if you want iCloud not to sync specific data, just click the respective toggle to turn it off.
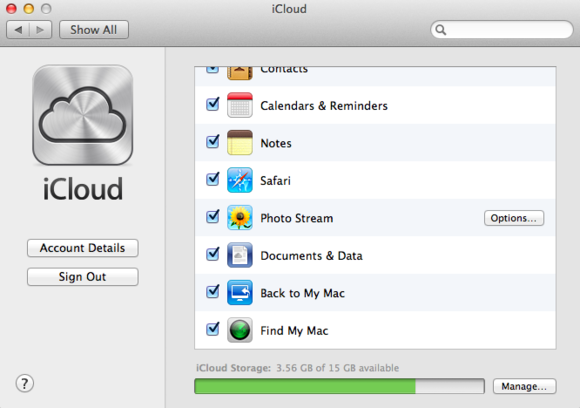
Unlike with iOS devices, you can’t create iCloud backups of your Mac—in part because said backups would likely eat up all your iCloud storage space, given the size of most Mac hard drives. But your Mac does offer support for iCloud’s data sync, allowing iCloud-compatible programs to store their documents and data there.
Set up a PC
In contrast to iOS devices and Macs, a Windows PC doesn’t come with any kind of iCloud control panel preinstalled; you first have to download it from Apple’s website. And, as noted above, your PC is also the only device you can’t use to create an iCloud account, so you’ll need to have first made one on your Mac or iOS device.
When you sign in to the control panel for the first time, it asks whether you want to send diagnostic and usage information to Apple; accepting this arrangement allows the company to automatically (and anonymously) collect data on any crashes you might have related to iCloud, and to send that data back to its central servers to prevent similar crashes from happening in the future.
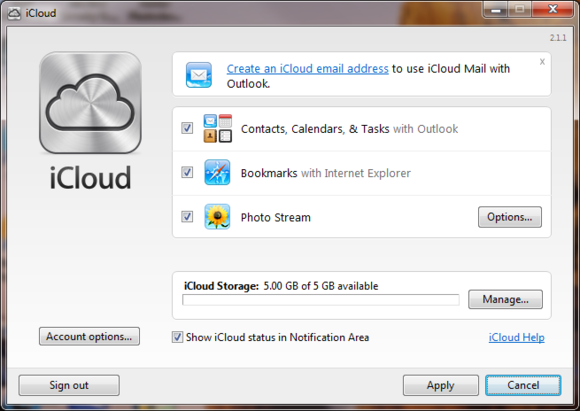
Your sync options for iCloud on the PC are limited in comparison to those on iOS devices and the Mac: You can sync email (if you’ve created an iCloud.com account); contacts, calendars, and tasks in Outlook; Web browser bookmarks; and your Photo Stream. Unfortunately, the Windows operating system doesn’t support syncing reminders, notes, iCloud data, or PC versions of Back to My Mac or Find My Mac.
If you need to make a change to your reminders and notes (or if you just want to see them), you can still access them online via iCloud.com.
Set up an Apple TV
Although your Apple TV doesn’t have access to iCloud’s calendars, reminders, notes, or mail, you can still access iCloud features such as Photo Stream and iTunes Match when you log in with the Apple ID tied to your iCloud account. To do so, go to theSettings screen of your Apple TV, click iTunes Store, and enter your account information.
 Posted in:


0 comments:
Post a Comment